Workday

Workday is a cloud-based ERP system that manages the business processes and allows organizations to use a system integrated application. Workday is a coherent cloud ERP system for financial analysis, analytical solutions, HCM suites, and better business processes.
The Sumo Logic App for Workday provides insights into authentication activity, user activity, and administrator activity. The pre-configured dashboards help identify events that identify compliance and incident reporting, common security events, and real-time analysis of suspicious activities.
Log Types
The Sumo Logic App for Workday collects all logs in JSON format. It uses the following two types of logs:
- SignOn Logs
- Audit Logs
Sample Log Messages
Workday App logs are all in JSON format. The Workday App uses two types of logs and this section provides examples of the log types.
{
    "Request_Originator":"UI",
    "Session_End":"2020-02-16T00:07:52-08:00",
    "Signon":"wd-environments / Workday Production Automation: 2020 02 16 00 07 52 329 -0800",
    "Device_is_Trusted":"0",
    "Password_Changed":"0",
    "Session_Start":"2020-03-19T00:07:52-08:00",
    "Invalid_Credentials":"0",
    "Workday_Account":"wd-environments / Workday Production Automation",
    "Is_Device_Managed":"0",
    "Required_Multi-Factor":"0",
    "Failed_Signon":"0",
    "Session_IP_Address":"127.0.0.1",
    "Account_Locked__Disabled_or_Expired":"0",
    "Authentication_Type_for_Signon":"User Name Password",
    "Session_ID":"863734",
  "tenant_name":"SumoLogic"
}
{
    "activityAction":"READ",
    "systemAccount":"wd-environments",
    "requestTime":"2020-03-26T07:12:07.006Z",
    "taskDisplayName":"Workday System Status",
    "taskId":"dc3e4ee2446c11de98360015c5e6daf6",
    "sessionId":"d245fc",
    "ipAddress":"127.0.0.1",
  "tenant_name":"SumoLogic"
}
Sample Query
The query sample provided in this section is from the Failed Login Reasons panel of the Workday - Login Activity dashboard.
Parameters
Failed_Signon:*Authentication_Failure_Message:*
_sourceCategory=workday_logs and _sourceName=signonlogs
| json auto
| where Failed_Signon=1
| count by Authentication_Failure_Message
| if (isBlank(Authentication_Failure_Message), "Unknown", Authentication_Failure_Message) as Authentication_Failure_Message
| sort by _count
Before You Deploy
Sumo Logic collects data from the User Activity and Signon Activity Reports via the Workday APIs. Once data collection is set up, the data in the Sumo Logic platform is analyzed via the Workday app in the Sumo Logic app catalog.
User activity data is collected through the Workday Audit Logs API. To ensure that no sensitive information is being sent to Sumo Logic via this report, please run the “User Activity” Report and check the columns (specifically the Target column). If the data contains sensitive info, you can enable data masking for the security group created in the steps outlined below by following the instructions in this doc.
Collecting Logs for the Workday App
This section explains how to collect logs from Workday and ingest them into Sumo Logic for use with the Workday App predefined dashboards and searches.
These instructions assume that the Security Administrator, System Auditor, and Report Administrator security groups are assigned to the user who will be configuring data collection in the Workday portal. Make sure the account used does not belong to an employee otherwise custom reports created by the user may no longer be available when they leave the organization.
Sumo Logic collects logs from Workday via a script that calls the Workday APIs. As part of the script configuration, you need to first configure log types that need to be collected, and these logs are then forwarded to Sumo Logic’s HTTPS source.
By default, the collection starts from the current date and time, but this setting is also configurable. For more information, see the Advanced Configuration options.
Recommended Deployment Process
We recommend deploying the Sumo Logic Workday integration using the following guidelines.
- Start by configuring the collector source as described in the sections below for your Workday Sandbox environment.
- Once the integration has been successfully deployed and tested in your Workday Sandbox environment, only then should you move to configuring this integration in your Workday production environment.
If you run into performance issues in your Workday production environment after you've configured integration, file a ticket with Workday to determine what is causing the degradation. Disable the right Sumo Logic Workday collector source if the Workday team determines that it is causing performance problems and then file a support ticket with Sumo Logic to resolve it.
Step 1: Configure the Workday Portal
This section demonstrates how to configure the Workday portal to integrate with Sumo Logic’s collection scripts. Configuring the Workday portal involves the following steps:
Step 1.1: Create an Integration System User
- Access the Create Integration System User task and provide the following parameters:
- User Name. SumoLogic_ISU
- New Password and New Password Verify. Enter the password
- Do Not Allow UI Sessions. Check the box
- Session Timeout Minutes. 0 (Disable session expiration)
- Click OK.
- Exempt the created user from the password expiration rule.
- Access Maintain Password Rules task.
- Add the users to System Users exempt from password expiration.
Step 1.2: Create a Security Group
- To create a security group, access the Create Security Group task and provide the following parameters:
- Type of Tenanted Security Group. Integration System Security Group (Unconstrained)
- Name. SumoLogic Client Security Group.
- Click OK.
- In the Edit Integration System Security Group (Unconstrained) window provide the following parameters:
- Integration System Users. SumoLogic_ISU
- Comment (Optional). Provide a short description
- Click OK.
- To attach the security group to a domain, access the View Domain task for the domain System Auditing.
- Select Domain > Edit Security Policy Permissions from the System Auditing related Actions menu.
- Add the SumoLogic Client Security Group you created to both the tables as below:
- Report/Task Permissions table. View access
- Integration Permissions table. Get access
- Click OK.
- To apply policy changes, access the Activate Pending Security Policy Changes task and activate the changes you made.
- Click OK.
Step 1.3: Register the API Client
- To register the API client, access the Register API Client for Integrations task, and provide the following parameters:
- Client Name. Sumo Logic Workday Collector
- Non-Expiring Refresh Tokens. Yes.
- Scope. System.
- Click OK.
- Copy the Client Secret and Client ID before you navigate away from the page and store it securely. If you lose the Client Secret, you can generate a new one using the Generate New API Client Secret task.
- Click Done.
- To generate a refresh token, access the View API Clients task and copy the below two parameters from the top of the page:
- Workday REST API Endpoint. The endpoint to use access to the resources in your Tenant.
- Token Endpoint. The endpoint used to exchange an authorization code for a token (if you configure authorization code grant).
- Go to API Clients for Integrations tab hover on “Sumo Logic Workday Collector API” client and click on the three-dot action buttons.
- In the new pop up window, click API Client > Manage Refresh Token for Integrations.
- In the Manage Refresh Token for Integrations window, select “SumoLogic_ISU” in the Workday Account field and click OK.
- In the newly opened window, select Generate New Refresh Token checkbox and click OK.
- Copy the value of the Refresh Token column from the opened window and click Done.
Step 1.4: Enable your tenant to send data
- To enable your Tenant to send data, access the Edit Tenant Setup - System task and ensure that the Enable User Activity Logging checkbox is selected.
- Access the Edit Tenant Setup - Security task and ensure that the OAuth 2.0 Clients Enabled checkbox is selected.
Step 1.5: Create a Custom sign on report
For customers that do not make use of the Recruiting Functional Area, the standard Candidate Signon report may not be available. The alternative is to create a new custom report with Data Source = “All System Account Signons” and Data Source Filter = “Workday System Account Signons in Range”. You can configure the fields using Excel.
- Go to Copy Standard Report to Custom Report task to create a Customs SignOn Report.
- Select Candidate Signons and Attempted Signons in Standard Report Name dropdown and click OK.
- In the new window, select Optimized for Performance checkbox, edit the report Name to Custom Signons and Attempted Signons Report and click OK.
- In the next window, edit the Data Source Filter field and select Workday System Account Signons in Range filter.
- Go to the Columns tab and click the + button to add the following new fields:
- Operating System
- Password Changed
- Request Originator
- SAML Identity Provider
- Forgotten Password Reset Request
- Multi-Factor Type
- Is Device Managed
- UI Client Type
- Browser Type
- Device is Trusted
- Remove the text in the Column Heading Override column, for Field > Session ID and Field > System Account. After configuring all the fields you can verify all the fields using the Excel.
- Go to the Advanced tab and click the Enable As Web Service checkbox under Web Service Options.
- Go to the Share tab, enable Share with specific users and groups option, add SumoLogic_ISU in the Authorized Users field, and click OK.
- Click Done. You can also test it by clicking the Run button.
- To get the Report URL, search for Custom Signons and Attempted Signons Report in the search bar and run the report.
- Click the Actions button and go to Web Service > View URLs.
- Click OK and copy the URL from JSON link. You will need this later while configuring the collection.
From the URL, remove any query parameters like json, From Moment and To Moment. The report URL should looks like this https://wd2-impl-services1.workday.com/ccx/service/customreport2/<tenant>/<accountname>/<reportname>
Step 2: Add a Hosted Collector and HTTP Source
This step is not needed if you're configuring the Cloud-to-Cloud Collector Source.
In this step, you create a hosted collector and HTTP source to receive data from the scripts that collect data from your Workday tenant.
- Configure a Hosted Collector, or select an existing hosted collector for the HTTP source.
- Configure an HTTP source on the hosted collector
Make a note of the HTTP address for the source. You will need it when you configure the collection for the Workday scripts in the next step.
Step 3: Configure Collection for Workday
In this section, we will configure a collection of login and audit logs from Workday and send them to Sumo Logic via one of the methods listed below.
- For non-FedRamp Sumo Logic deployments, create a Workday Cloud To Cloud Collector Source.
- If you're using the Sumo Logic FedRamp deployment, choose one of the following options:
- AWS Lambda based collection: Use a Sumo Logic Workday collection script to be run in an Amazon Web Services (AWS) environment using the AWS Lambda service via a Serverless Application Model (SAM) application.
- Script-based collection: Run Sumo Logic Python scripts to run periodically on a Linux machine via a cron job.
Deploy the Sumo Logic Workday SAM Application in your AWS environment (DEPRECATED)
See Configure the script on a Linux machine instead.
Deploy the SAM application to create the necessary resources in your AWS account.
To deploy the Sumo Logic Workday SAM Application, do the following:
- Go to https://serverlessrepo.aws.amazon.com/applications.
- Search for sumologic-workday, and select the Show apps that create custom IAM roles or resource policies checkbox and click the app link when it appears.
- When the Sumo Logic app page appears, click Deploy.
- In the AWS Lambda > Functions > Application Settings panel, specify the following parameters in the corresponding text fields:
- HTTPLogsEndpoint. Paste the URL for the HTTP Logs source from Step 2.
- SignonReportUrl. Paste the signon report url from Step 1.5.
- IntegrationSystemUserPassword: Paste the SumoLogic_ISU account password copied from Step 1.1.
- IntegrationSystemUsername. Name of the account created in Step 1.1.
- WorkdayRestApiEndpoint. Paste the Workday Rest API endpoint copied from Step 1.4.
- RefreshTokenEndpoint. Paste the Token endpoint copied from Step 1.4.
- ClientId. Paste the API Client ID copied from Step 1.4.
- ClientSecret. Paste the API Client SECRET copied from Step 1.4.
- RefreshToken. Paste the Refresh token generated from Step 1.4.
- Click Deploy.
- After the deployment, you can verify whether all the resources are created completely.
Configure script-based collection for Workday (DEPRECATED)
See Configure the script on a Linux machine instead.
Learn how to configure script-based log collection for the Sumo Logic Workday App.
The sumologic-workday script is compatible with python 3.7 and python 2.7, and has been tested on Ubuntu 18.04 LTS.
Prerequisites
This task makes the following assumptions:
- You have successfully added a Hosted Collector and HTTP source and copied configuration parameters (HTTPLogsEndpoint, SignonReportUrl, IntegrationSystemUserPassword, IntegrationSystemUsername, WorkdayRestApiEndpoint, RefreshTokenEndpoint, ClientId, ClientSecret, and RefreshToken) from the Workday console, as described in Add a Hosted Collector and HTTP Source section.
- You are logged in to a Linux machine as the user account with which you will install the collector. If not, use the following command to switch to that account:
sudo su <user_name>
Configure the script on a Linux machine
This task shows you how to install the script on a Linux machine.
- For python 3, use:
pip3 install sumologic-workday - For operating systems where default python is not python3, use:
/usr/bin/python3 -m sumoworkdaycollector.main
To deploy the script on a Linux machine, do the following:
If pip is not already installed, follow the instructions in the pip documentation to download and install pip.
Log in to a Linux machine (compatible with either Python 3.7 or Python 2.7).
Do one of the following:
- For Python 2, run the following command:
pip install sumologic-workday - For Python 3, run the following command:
pip3 install sumologic-workday
- For Python 2, run the following command:
Create a
sumoworkdaycollector.yamlconfiguration file in the home directory and fill in the parameters as shown in the following example.SumoLogic:
HTTP_LOGS_ENDPOINT: <Paste the URL for the HTTP Logs source from step 2.>
Workday_Report_Config:
SIGNON_REPORT_URL: <SIGNON REPORT URL from Step 1.i>
ISU_USERNAME: SumoLogic_ISU
ISU_PASSWORD: <PASSWORD copied from Step 1.a>
TIMEOUT: 600
MAX_FETCH_INTERVAL: 86400
MIN_FETCH_INTERVAL: 60
API_CALL_DELAY_SECONDS: 60
Workday_API_Config:
AUDIT_API_URL: "/auditLogs"
WORKDAY_REST_API_ENDPOINT: <Workday Rest API endpoint copied from Step 1.g>
REFRESH_TOKEN_ENDPOINT: <Token endpoint copied from Step 1.g>
CLIENT_ID: <API Client ID copied from 1.f>
CLIENT_SECRET: <API Client SECRET copied from 1.f>
REFRESH_TOKEN: <Refresh token generated from Step 1.g>
PAGINATION_LIMIT: 100
TIMEOUT: 60
API_CALL_DELAY_SECONDS: 60
BLACKLIST_TASK_NAMES:
- "Search in Main Page (Web Service)"
- "Home"Create a cron job to run the collector every 5 minutes, (use the
crontab -eoption). Do one of the following:- For Python 2, add the following line to your crontab:
*/5 * * * * /usr/bin/python -m sumoworkdaycollector.main > /dev/null 2>&1 - For Python 3, add the following line to your crontab:
*/5 * * * * /usr/bin/python3 -m sumoworkdaycollector.main > /dev/null 2>&1
- For Python 2, add the following line to your crontab:
Advanced Configuration
This section provides a list of variables for Workday that you can define in the configuration file.
We do not recommend significantly changing how Workday APIs are being invoked by the Sumo Logic collection scripts as these may cause performance problems on your Workday instance.
The Workday specific configuration is shown in below two sections:
Workday_Report_Config. Remove this section to stop collecting SignOn logs from the custom report.Workday_API_Config. Remove this section to stop collecting audit logs via REST API.
You can view the entire configuration with default settings here. For SAM deployments you can update sumoworkdaycollector.yaml file in the AWS Lambda console editor.
The following table provides a list of variables for Workday that you can optionally define in the configuration file.
| Variable | Usage | Default |
| API_CALL_DELAY_SECONDS | This is the sleep time between multiple API calls to the Workday. | The default value is 60 seconds. |
| TIMEOUT in Workday_Report_Config section | This is the maximum time the request waits for the Workday RAAS API before it times out when making a call. | The default value is 600 seconds. |
| MAX_FETCH_INTERVAL And MIN_FETCH_INTERVAL In Workday_Report_Config section | The Workday RAAS API fetches data between a start and end interval. Depending on the users in your tenant the data may exceed 2 GB. The maximum and minimum interval between start and end time is controlled by these two settings. Calibrate these two settings such that MIN_FETCH_INTERVAL contains less than 2GB data always. Set the MAX_FETCH_INTERVAL in such a way that it does not put too much load on your tenant. | MAX_FETCH_INTERVAL: The default is 3600 that is 1 hour. MIN_FETCH_INTERVAL: The default is 60 that is 1 minute. |
| PAGINATION_LIMIT in Workday_API_Config section | The number of events fetched in a single page. | The default value is 100 rows. |
| TIMEOUT in Workday_API_Config section | This is the maximum time the request from a script waits for the REST API before it times out. | The default value is 60 seconds. |
| BACKFILL_DAYS in Collection Section | The number of days before the event collection will start. If the value is 1, then events are fetched from the last 24 hours. The maximum allowed value is 1. | The default value is 0. |
| ENABLE_LOGFILE in Logging Section | Set to TRUE to write all logs and errors to a log file. | The default value is False. |
| ENABLE_CONSOLE_LOG in Logging Section | It enables printing logs in a console. | The default value is True. |
| LOG_FILEPATH in Logging Section | The path of the log file used when ENABLE_LOGFILE is set to TRUE. | Default is /tmp/sumoworkdaycollector.log |
| NUM_WORKERS in Collection Section | The number of threads to spawn for API calls. | The default is 2 concurrent requests. |
| MAX_RETRYin Collection Section | The number of retries to attempt in case of request failure. | The default is 3 attempts. |
| BACKOFF_FACTOR in Collection Section | A backoff factor has to be applied between attempts after the second try (most errors are resolved immediately by a second try without a delay). If the backoff_factor is 0.1, then sleep() will sleep for [0.0s, 0.2s, 0.4s, …] between retries. | The default is 5. |
| TIMEOUT in Collection Section | Max Timeout while sending logs to Sumo Logic. | The default is 60 seconds. |
| HTTP_LOGS_ENDPOINT in SumoLogic section | HTTP source endpoint URL created in Sumo Logic for ingesting Logs. | |
| BLACKLIST_TASK_NAMES | To filter out tasks that should not be ingested into Sumo Logic. | The default tasks are:
|
Troubleshooting
This section shows you how to run the function manually and then verify that log messages are being sent from Workday.
To run the function manually, do the following:
- Enter one of the following commands:
- For python, use:
python -m sumoworkdaycollector.main - For python3, use:
python3 -m sumoworkdaycollector.main
- For python, use:
- Check the automatically generated logs in /tmp/sumoapiclient.log to verify whether the function is getting triggered.
- If you installed the collector as
rootuser and then run it as a normal user, you will see an error message similar to the following because the config is not present in the home directory of the user running the collector. Switch to therootuser and run the script again.
You can also avoid this error by running the script with config file path as the first argument.
Traceback (most recent call last):
 File "/usr/local/lib/python2.7/dist-packages/sumoworkdaycollector/main.py", line 190, in main
   ns = WorkdayCollector()
 File "/usr/local/lib/python2.7/dist-packages/sumoworkdaycollector/main.py", line 29, in __init__
   self.config = Config().get_config(self.CONFIG_FILENAME, self.root_dir, cfgpath)
 File "/usr/local/lib/python2.7/dist-packages/sumoworkdaycollector/common/config.py", line 22, in get_config
   self.validate_config(self.config)
 File "/usr/local/lib/python2.7/dist-packages/sumoworkdaycollector/common/config.py", line 34, in validate_config
   raise Exception("Invalid config")
Exception: Invalid config
Installing the Workday App
This section provides instructions on how to install the Workday App, as well as examples of each of the dashboards. The App's pre-configured searches and dashboards provide easy-to-access visual insights into your data.
As part of this beta, the app will automatically be installed in the Sumo Logic account of your choice as part of the Admin recommended folder.
Panels will start to fill automatically once you have configured the collection. It's important to note that each panel slowly fills with data matching the time range query and received since the panel was created. Results won't immediately be available, but with time, you'll see full graphs and maps.
Viewing Workday Dashboards
Template variables provide dynamic dashboards that can rescope data on the fly. As you apply variables to troubleshoot through your dashboard, you view dynamic changes to the data for a quicker resolution to the root cause. You can use template variables to drill down and examine the data on a granular level. For more information, see Filter with template variables.
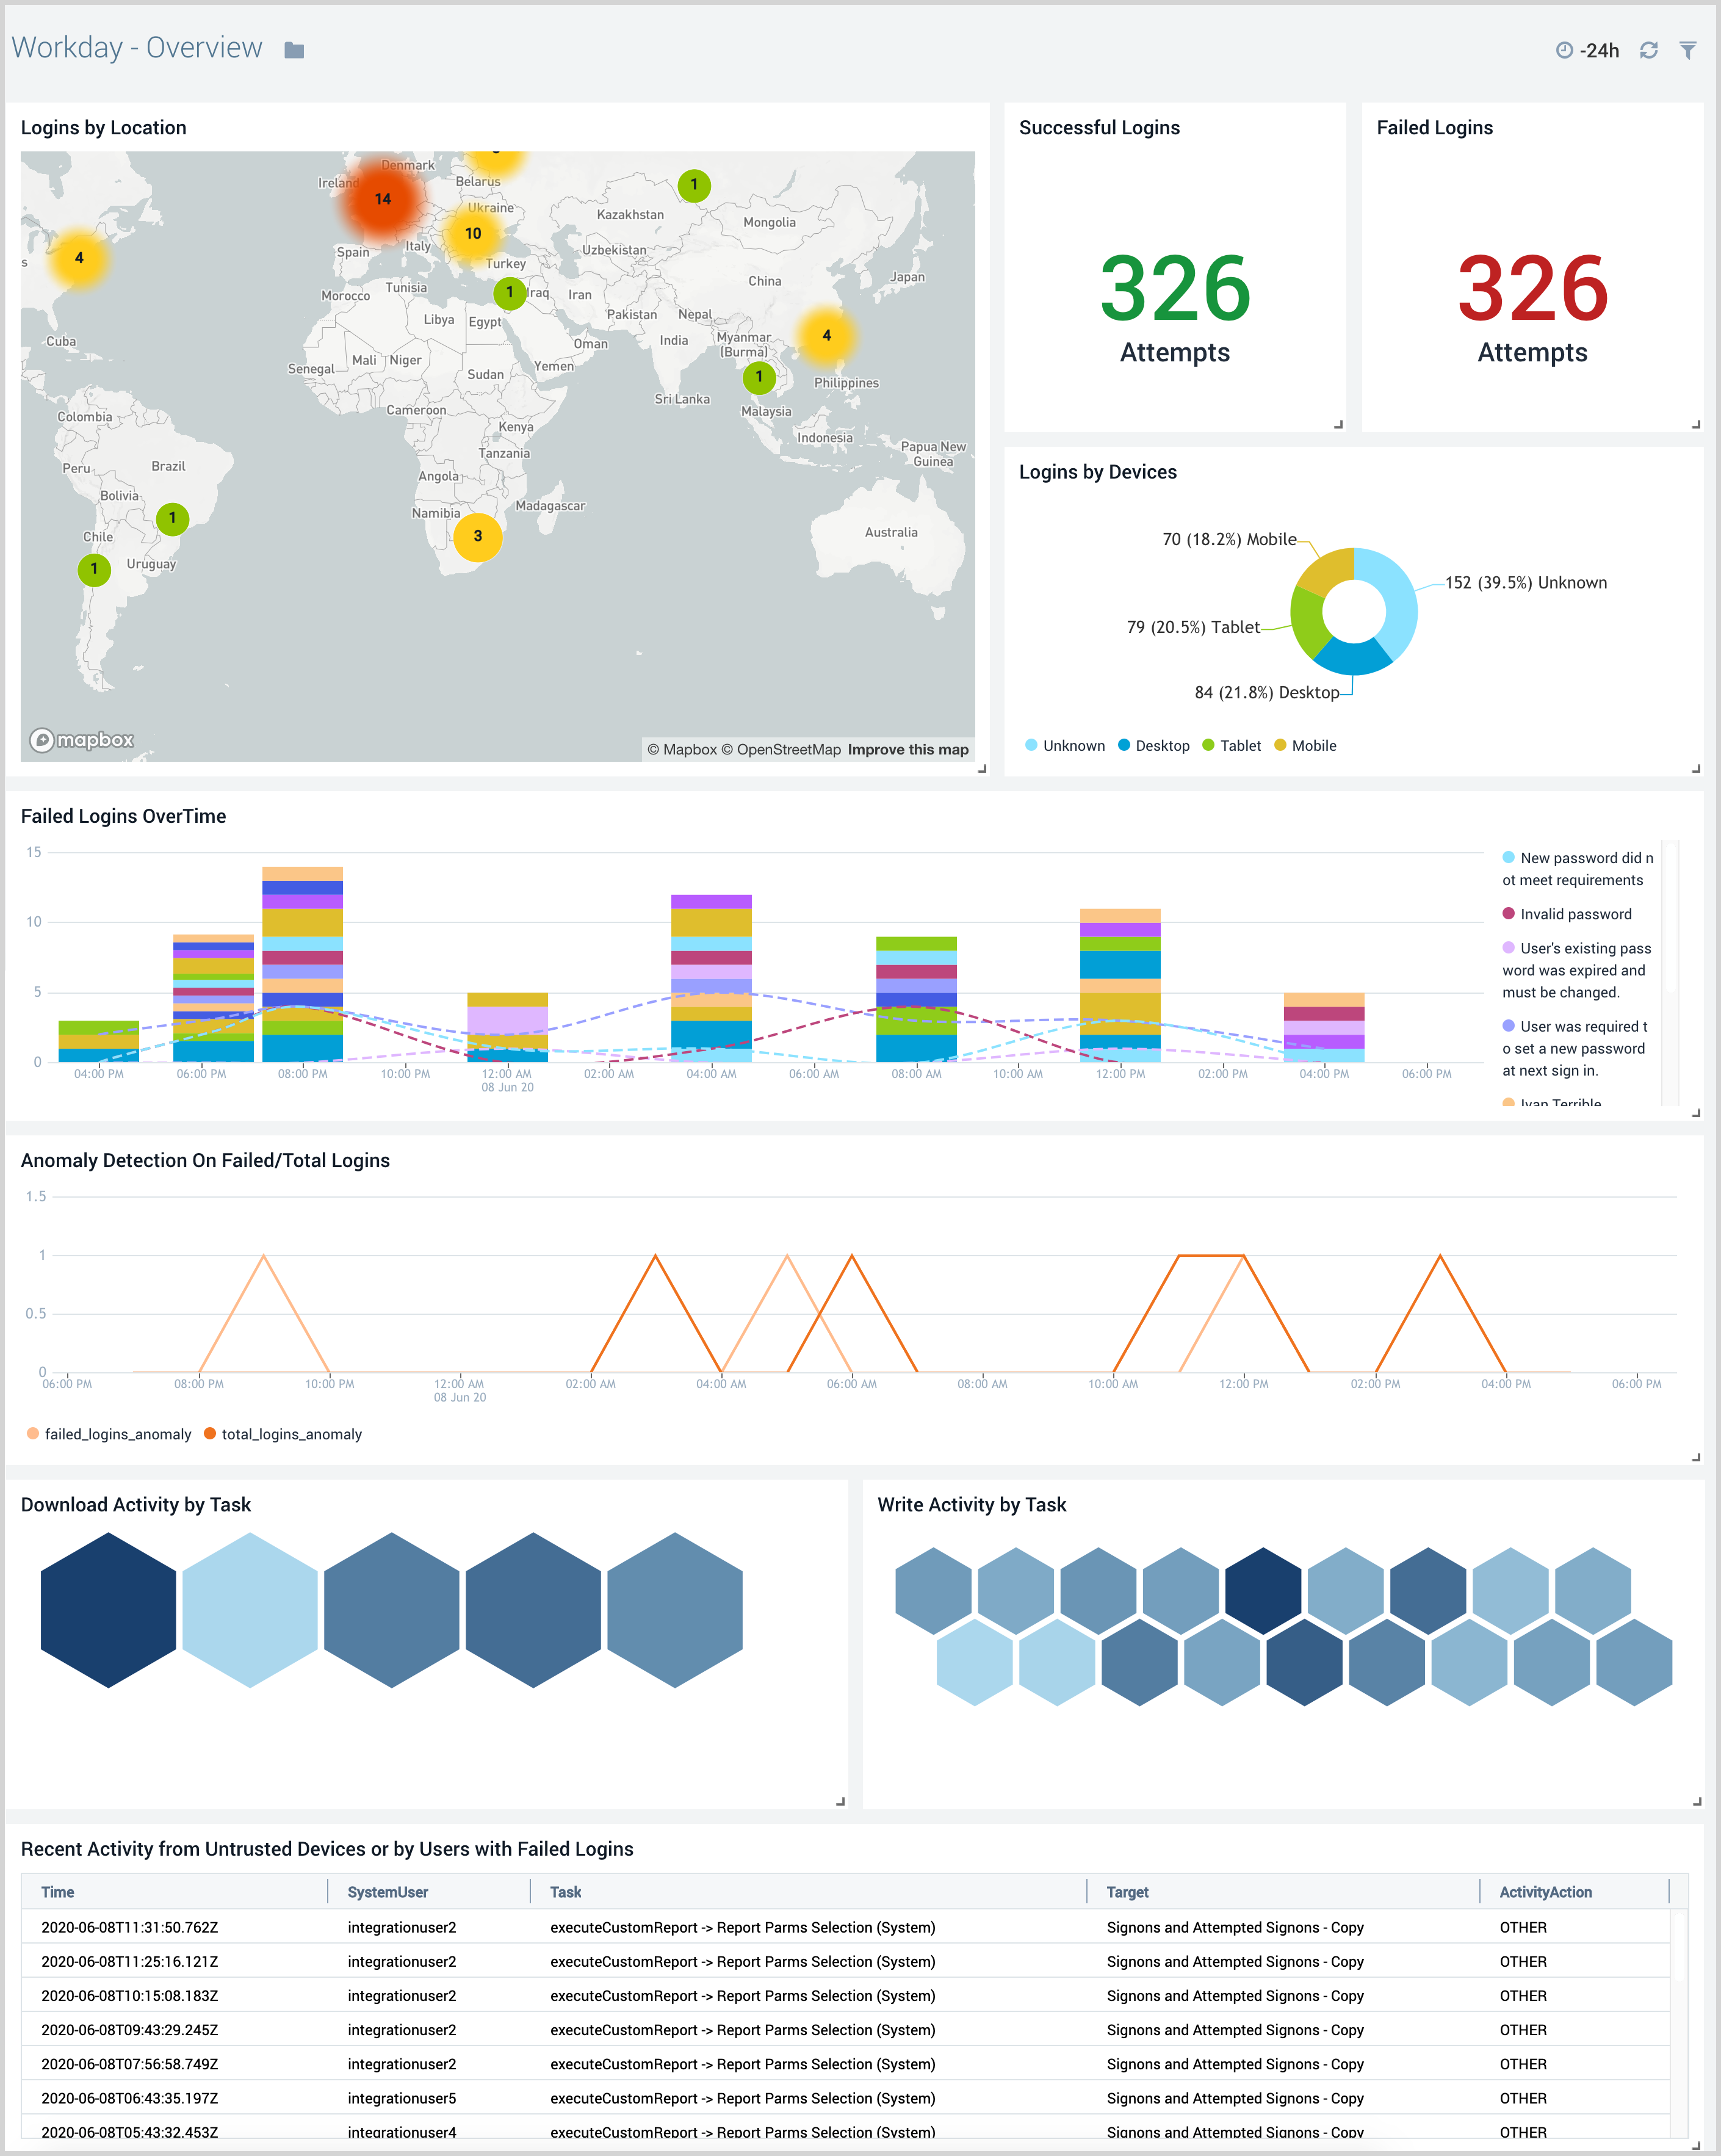
Overview
The Workday - Overview dashboard provides an at-a-glance view of the security posture of your Workday instance. Panel identify login activity, user activity, and activity from untrusted devices or users with failed logins. It also helps you in monitoring failed logins by devices and the recent activities from untrusted devices.
Use this dashboard to:
- To quickly identify anomalous increases in total and failed logins.
- Monitor recent user activities from untrusted devices and users with multiple failed login attempt to determine the extent of a potential breach.
- Quickly identify if users are logging in from expected locations and using supported devices.
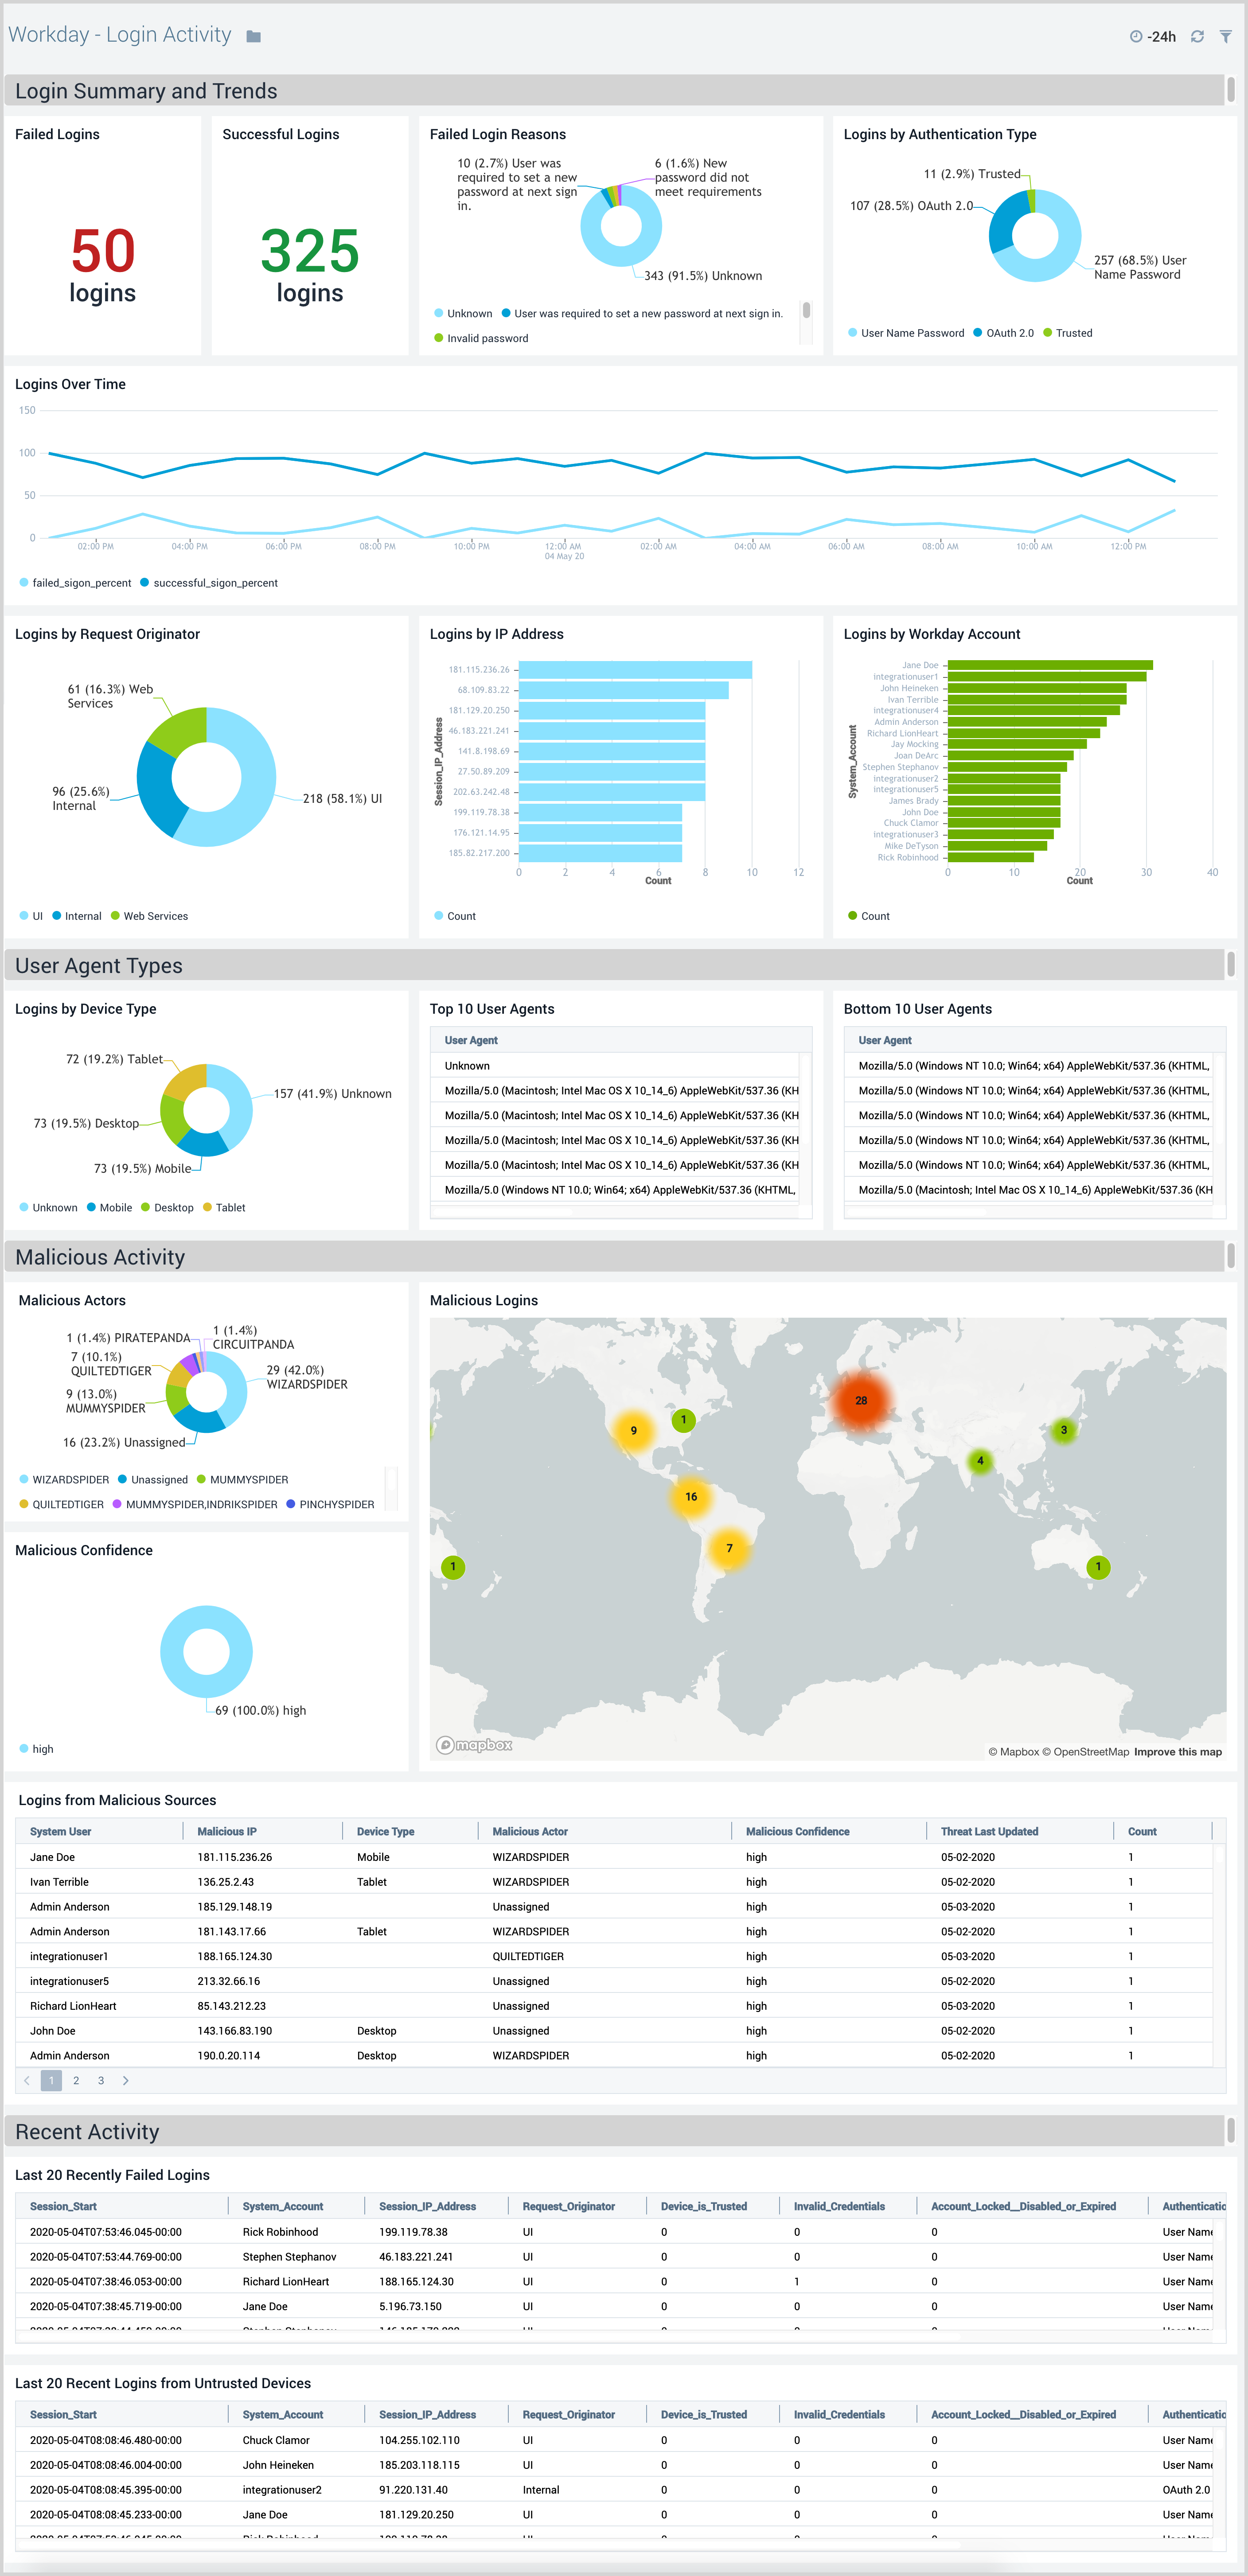
Login Activity
The Workday - Login Activity dashboard provides detailed insights into login summary, trends, and malicious activities. Panel also displays recent login activity and details of devices and browsers used to login to the Workday portal.
Use this dashboard to:
- Identify login requests received from malicious remote IPs and untrusted devices.
- Quickly identify if users are logging in from expected locations and using devices supported by your IT teams.
- Get insight into trends around login events to determine the times of day your Workday instance is being used the most.
- Quickly identify if there are an unusually high number of failed logins.
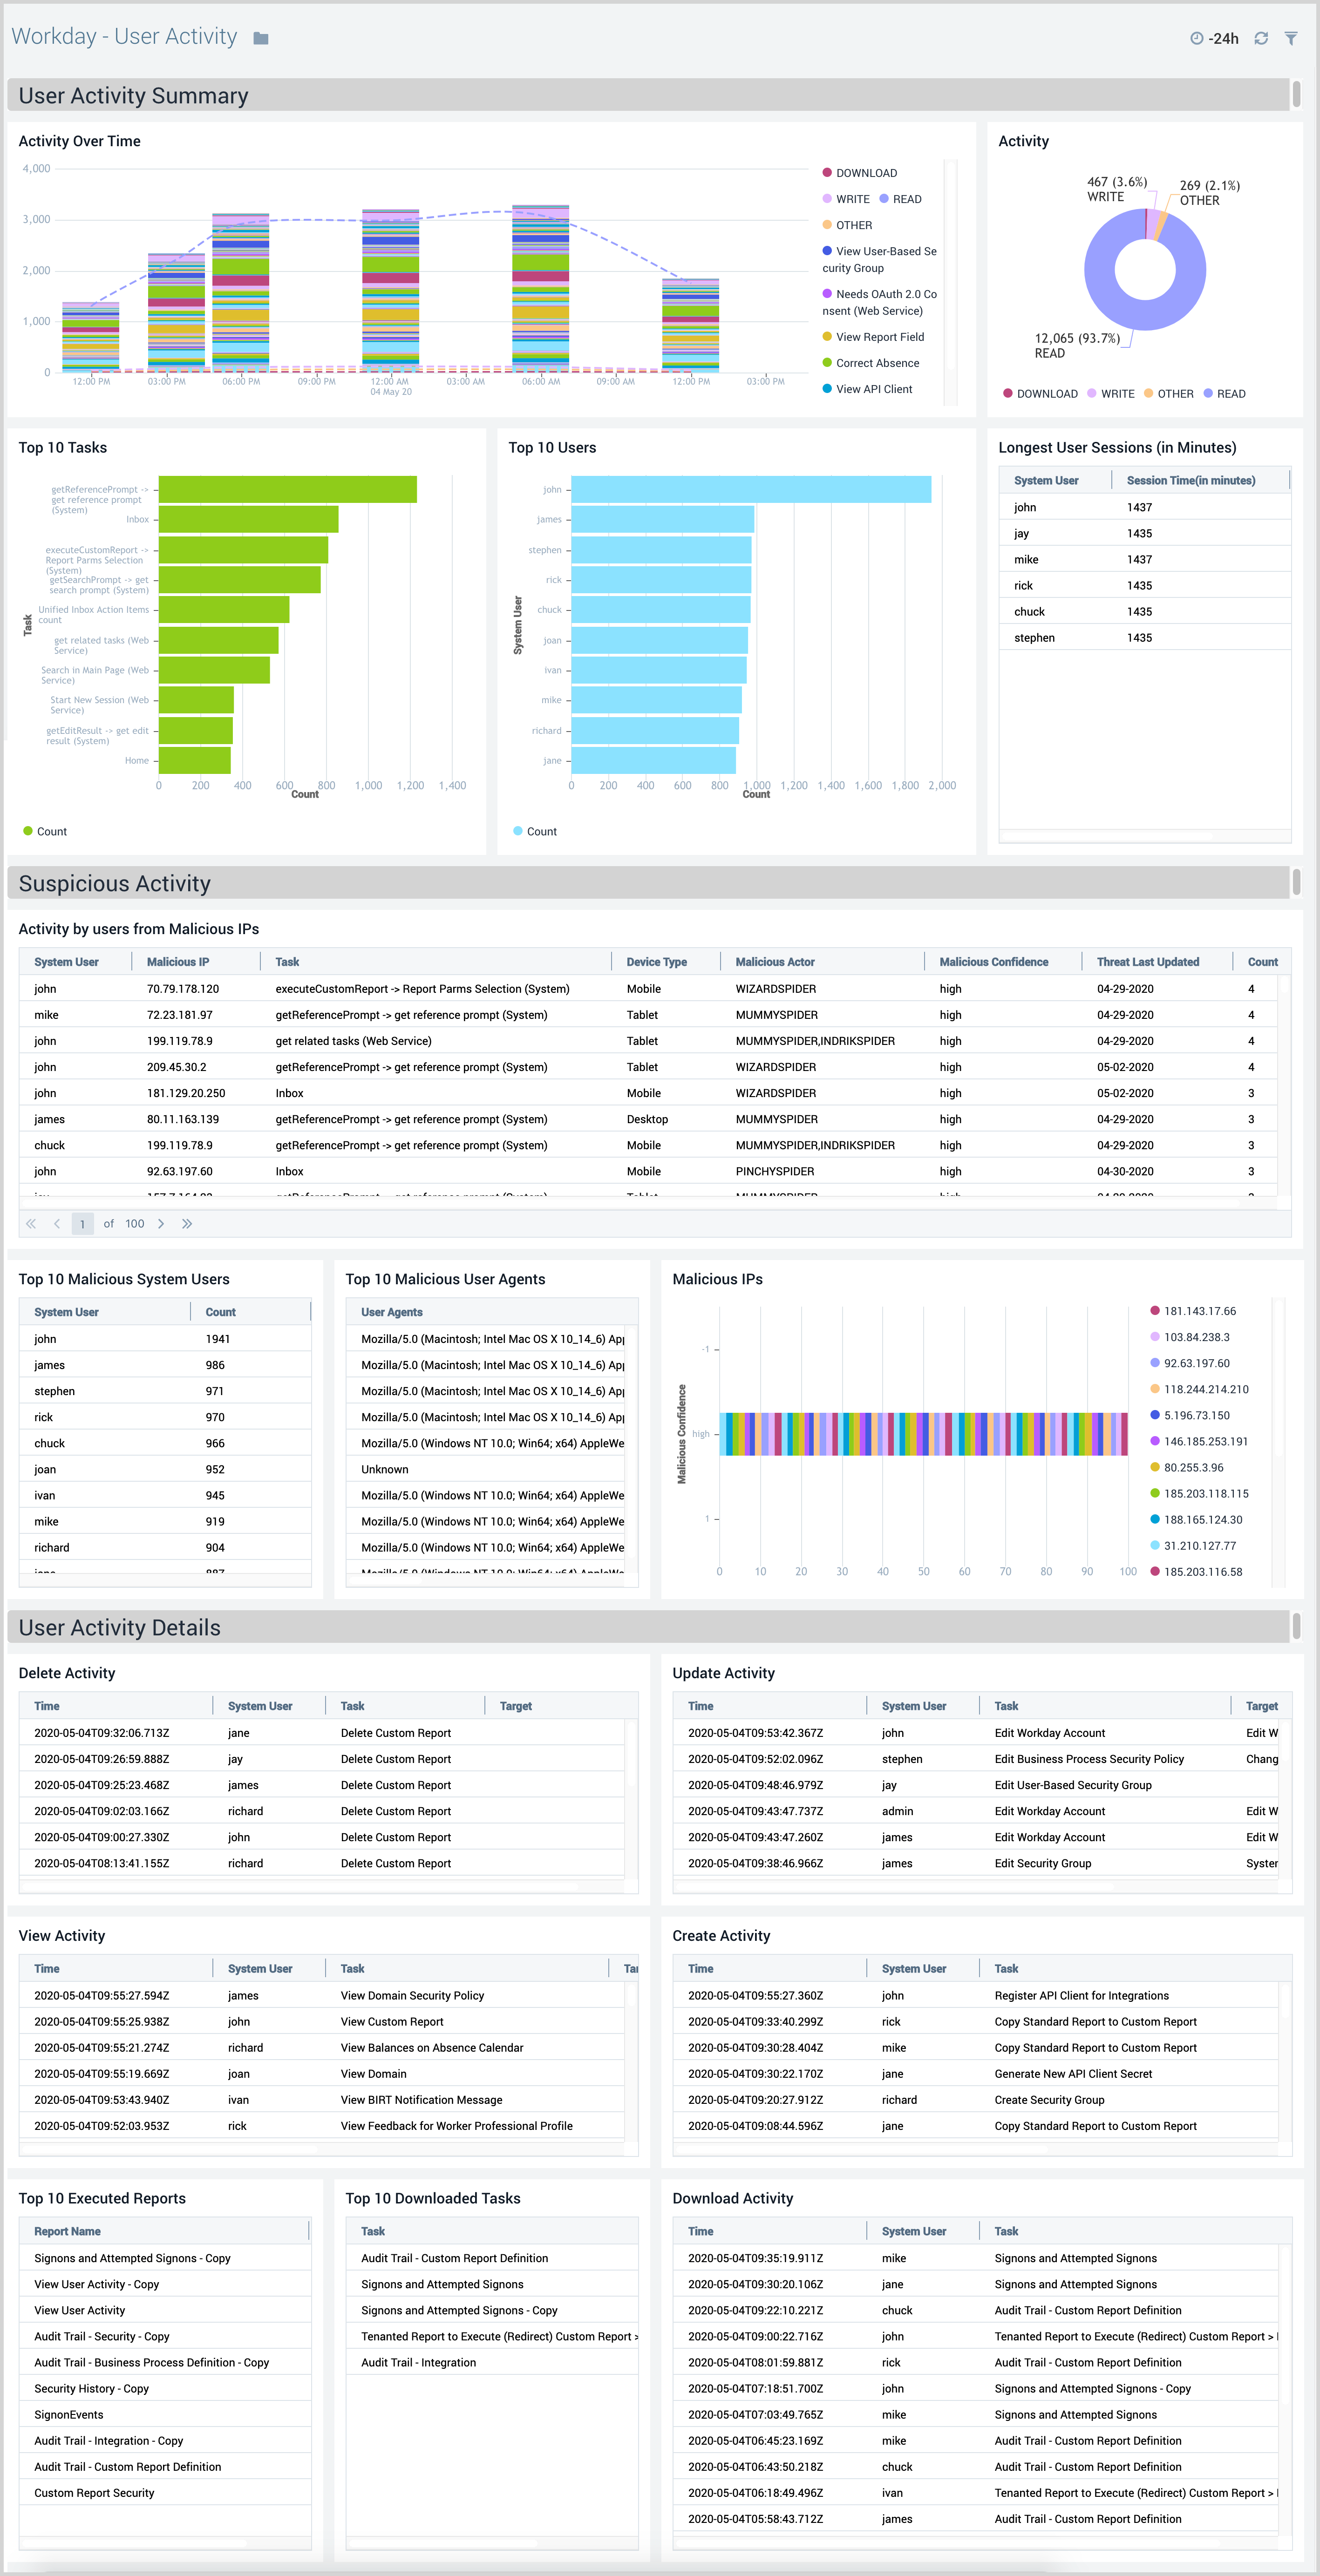
User Activity
The Workday - User Activity dashboard provides detailed insight into all user activity and potential suspicious activities in your Workday instance.
Use this dashboard to:
- Monitor if Workday tasks executed by users are according to expectations.
- Get insights into CRUD(Create/Read/Update/Delete) and download activity Quickly identify if login and user activity are originating from known malicious IP addresses.
System User Activity
The Workday - System User Activity dashboard monitors the system user activities. Panels also identify all configuration changes related to domain security, business processes, security groups, and API client modules.
Use this dashboard to:
- Identify if key configuration changes are in line with expectations.
- Identify changes related to permission and role assignments.

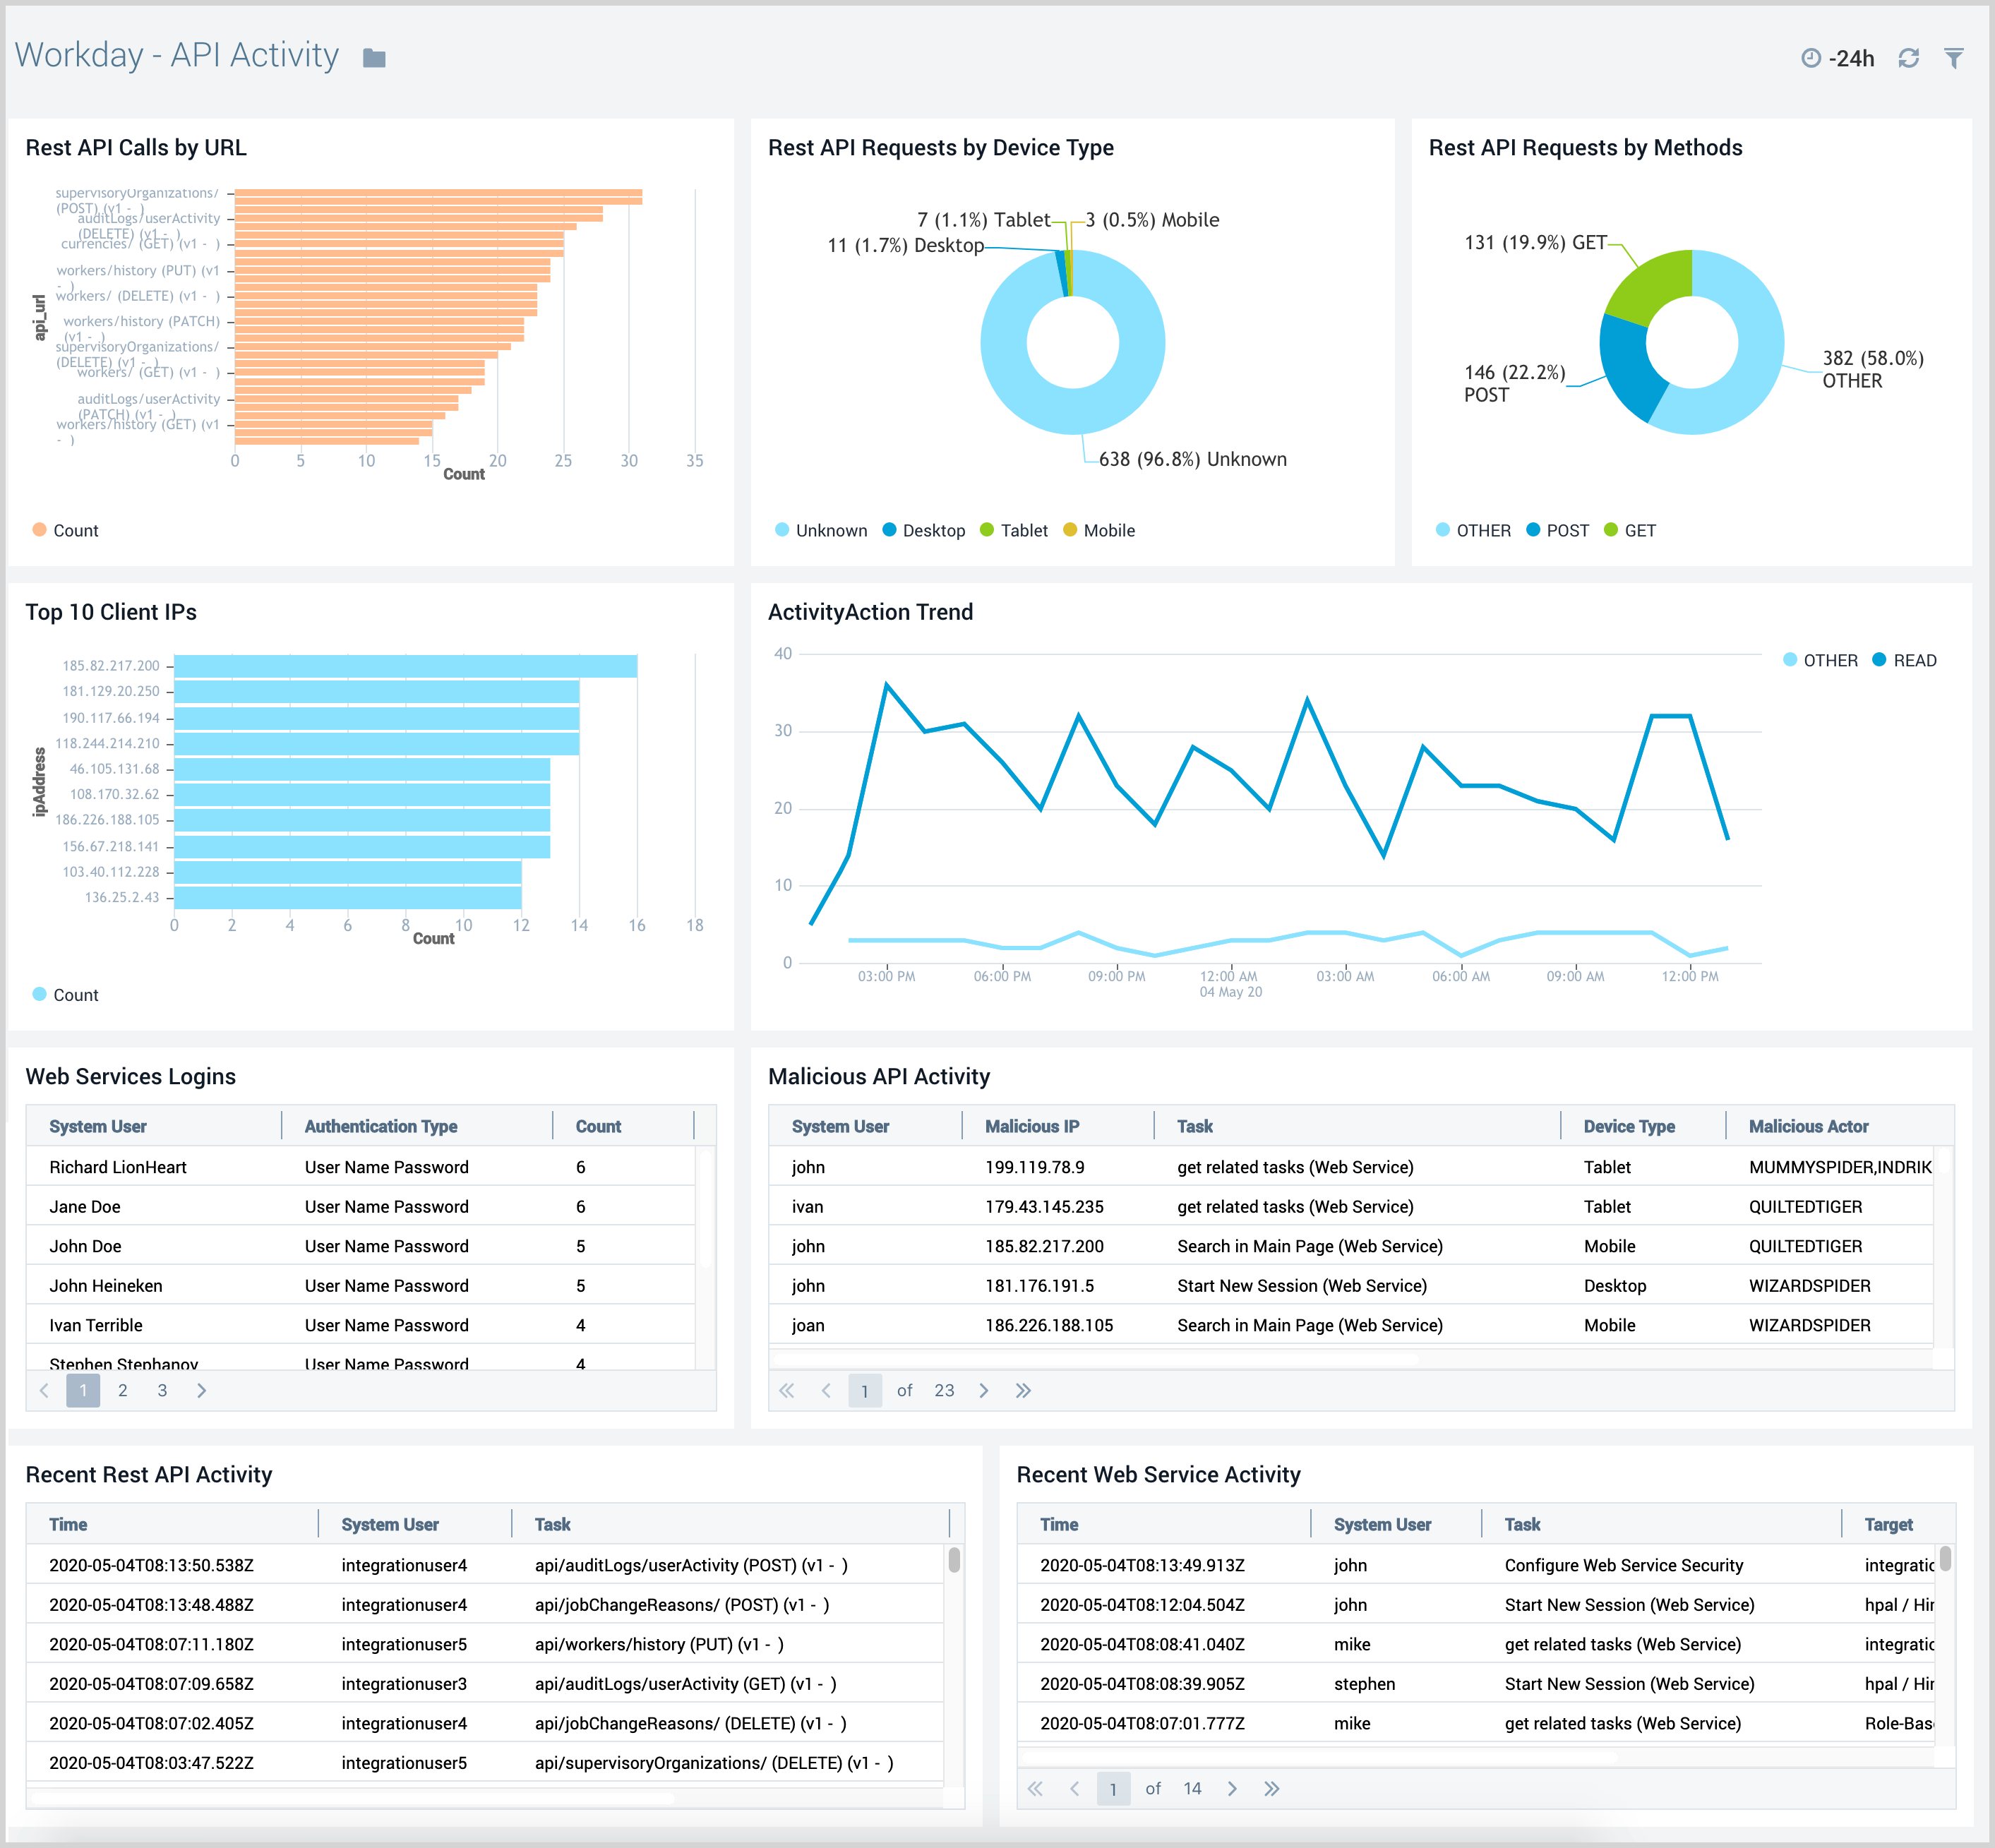
API Activity
The Workday - API Activity dashboard gives you insight into all analytics for REST API calls and web service related authentications and monitors access attempts from known malicious IP addresses.
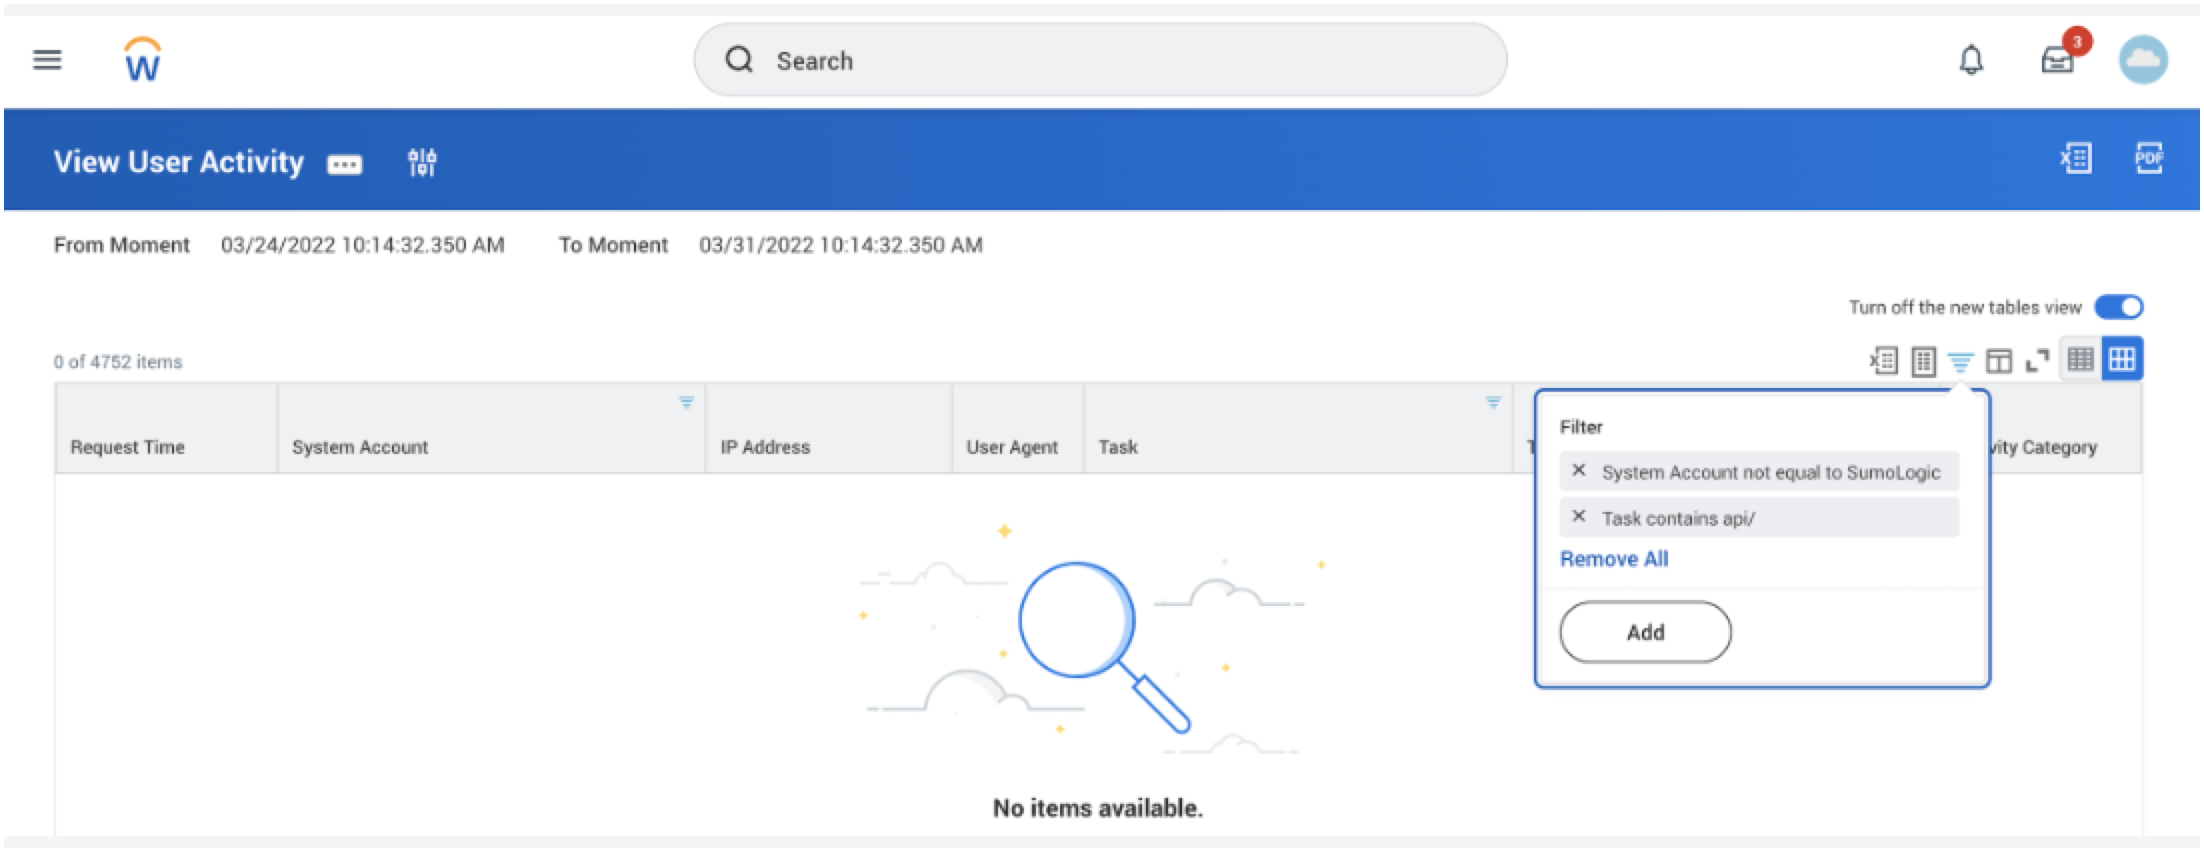
API activity dashboard populates if there is any API activity happening on in their tenant, may be there isn't any workday rest apis (not SOAP) they are using. They can verify this by going to the User Activity report in their workday tenant and running the report with following filters
Task contains api/ and System Account not equal to SumoLogic_ISU.
Use this dashboard to:
- Monitor API related read, write, and other activities to ensure they match the expectations.
- Quickly identify any API requests originating from malicious IP addresses.
- Identify if API requests are being received from devices not supported by your IT teams.