Forwarding Data from Sumo Logic to S3
This topic has instructions for forwarding data from Sumo Logic to an S3 bucket.
Data forwarding is not currently supported for data assigned to the Infrequent Tier.
You can forward log data from a Partition or Scheduled View to an S3 bucket. Only new data is forwarded from a Partition once it is set to forward data.
After data forwarding is configured, you should start to see file objects posted within your configured bucket. If your Scheduled View conducts aggregation, which is a best practice, your aggregate fields are automatically appended to the forwarded objects.
Prerequisites
- An administrator role on the Partition where you want to set up forwarding.
- Follow the instructions on Grant Access to an AWS Product to grant Sumo permission to send data to the destination S3 bucket.
- A Partition or Scheduled View to push to AWS S3.
Forwarding interval
Messages are buffered during data ingest for either approximately 5 minutes or until 100MB of data is received, whichever is first. Then the buffered data is written to a new CSV file and forwarded after compression.
The limits mentioned here are upper limits, actual file size may vary depending on the ingestion volume in Scheduled Views or Partitions of an account.
It takes approximately 5 minutes to propagate a new or changed S3 data forwarding rule or bucket across the Sumo service. So, it is possible after you create or modify a rule, the first 5 minutes of data forwarded might not be written to S3.
File Format of forwarded data
After you start forwarding data to S3, you should start to see file objects posted in your configured bucket. The log messages are accumulated and returned after being ingested by Sumo.
The log messages are saved in CSV files in compressed gzip files and named according to the convention you specified when you configured Sumo to start data forwarding, as described in step 5 of Start data forwarding to S3. The file naming convention for legacy data forwarding is described below in Legacy File Naming Format.
Messages are buffered during data ingest for either approximately 5 minutes or until 100MB of data is received, whichever is first. Then the buffered data is written to a new CSV file and forwarded.
These file objects will contain the messages received as well as the system metadata for the messages, including:
- messageId: The unique ID for the specific message within Sumo Logic.
- sourceName: Is returned blank.
- sourceHost: Is returned blank.
- sourceCategory: Is returned blank.
- messageTime: The parsed message time from the log message, as epoch.
- receiptTime: The time the service originally received the message, as epoch.
- sourceID: The unique ID of the Source configured to send the message to the service.
- collectorId: The unique ID of the Collector configured to send the message to the service.
- count: The message number from the specific log Source Name. These should be sequential for a specific Source file.
- format: The timestamp format used to parse the message time from the log message
- encoding: The encoding of the original file contents.
- message: The raw log message as read from the original Source.
- \<field>: Aggregate fields are added based on your query.
Example
Metadata fields
messageId,sourceName,sourceHost,sourceCategory,messageTime,receiptTime,sourceId,collectorId,count,format,view,encoding,message,field1,field2
Sample object
"-9223371513354977010","","","","1472590091453","1472590094034","101688020","100607825","979","plain:atp:o:0:l:29:p:yyyy-MM-dd HH:mm:ss,SSSZZZZ","JchenTest2","UTF8","2016-08-30 13:48:11,453 -0700 WARN [hostId=nite-cqsplitter-1] [module=cqsplitter] [localUserName=cqsplitter] [logger=cqsplitter.engine.CQsMultiMatchersManager] [thread=DTP-cqsplitter.receiver.consumer.v2.threadpool-6] MultiMatcher queue for customer 0000000000000131 is at capacity, adding element will block.","25","0000000000000131"
Legacy File Naming Format
The file naming convention for legacy data forwarding (prior to January 2017) is: <start_epoch>-<end_epoch>--<objectid>.csv.gz
Where:
start_epochis the epoch time representing the parsed message time of the first message contained within the fileend_epochis the epoch time representing the parsed message time of the last message contained within the file.objectidis a unique ID for the file object, which is generated by Sumo at creation time.
Configure an S3 data forwarding destination
- In Sumo Logic, select Manage Data > Logs > Data Forwarding.
- Click + Destination to add a new destination.
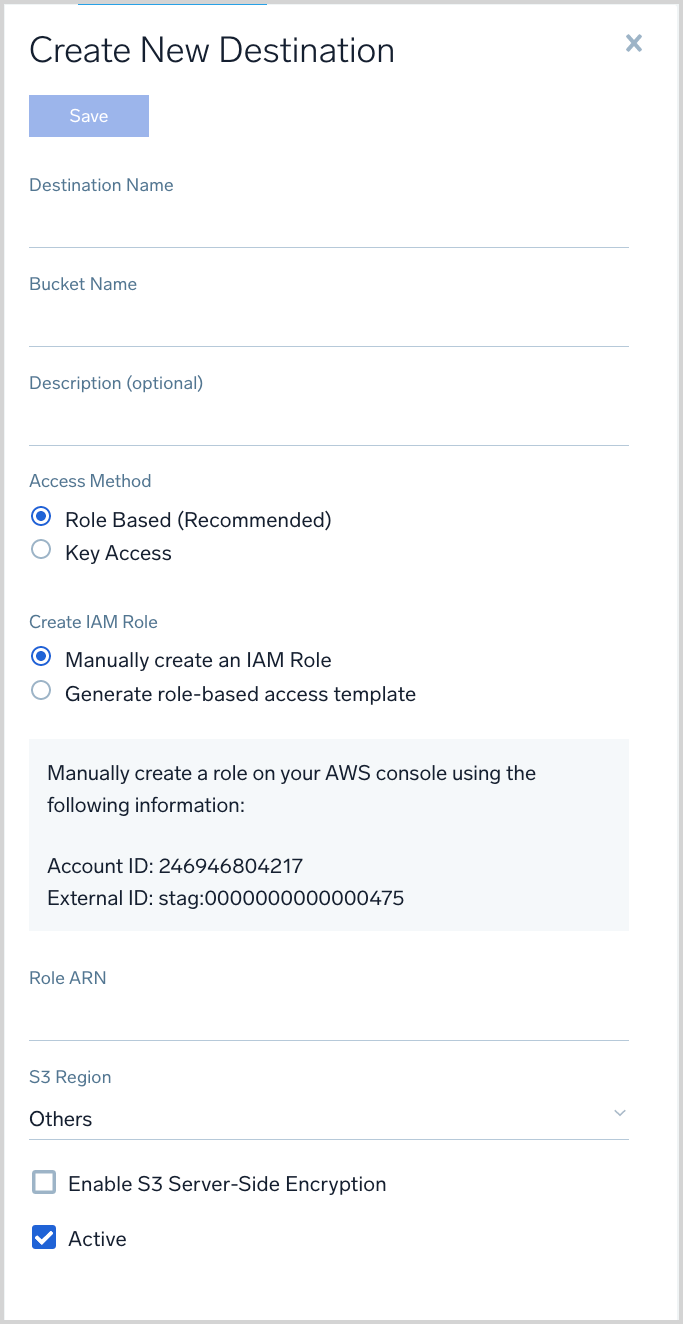
- The Create New Destination popup appears.

- Destination Name. Enter a name to identify the destination.
- Bucket Name. Enter the exact name of the S3 bucket.note
You can create only one destination with a particular bucket name. If you try to create a new destination with the bucket name of an existing destination, the new destination replaces the old one.
- Description. You can provide a meaningful description of the connection.
- Access Method. Select Role-based access or Key access based on the AWS authentication you are providing. Role-based access is preferred, this was completed in the prerequisite step Grant Sumo Logic access to an AWS Product.
- For Role-based access enter the Role ARN that was provided by AWS after creating the role.
- For Key access enter the Access Key ID and Secret Access Key. See AWS Access Key ID and AWS Secret Access Key for details.
- S3 Region. Select the S3 region or keep the default value of Others. The S3 region must match the appropriate S3 bucket created in your Amazon account.
- Enable S3 server-side encryption. Select the check box if you want the forwarded data to be encrypted. For more information, see Protecting Data Using Server-Side Encryption with Amazon S3-Managed Encryption Keys (SSE-S3) in AWS help.
- Active. Select this check box to enable Data Forwarding for the entire S3 bucket. To start Data Forwarding you will also need to enable forwarding for the desired indexes, as described below in this topic.
- Click Save.
If Sumo Logic is able to verify the S3 credentials, the destination will be added to the list of destinations, and you can start Data Forwarding for specific Partitions or Scheduled Views, as described in the following section in this topic. See Error and alert conditions in this topic for examples of errors that can occur.
Forward data to S3
This section has instructions for enabling data forwarding for an existing Partition or Scheduled View.
You can also enable Data Forwarding when you first create a Partition or Scheduled View by selecting the Enable Data Forwarding check box.
- In Sumo Logic, go to Manage Data > Logs > Partitions, or Manage Data > Logs > Scheduled Views, depending on whether you want to forward data from a Partition or a Scheduled View.
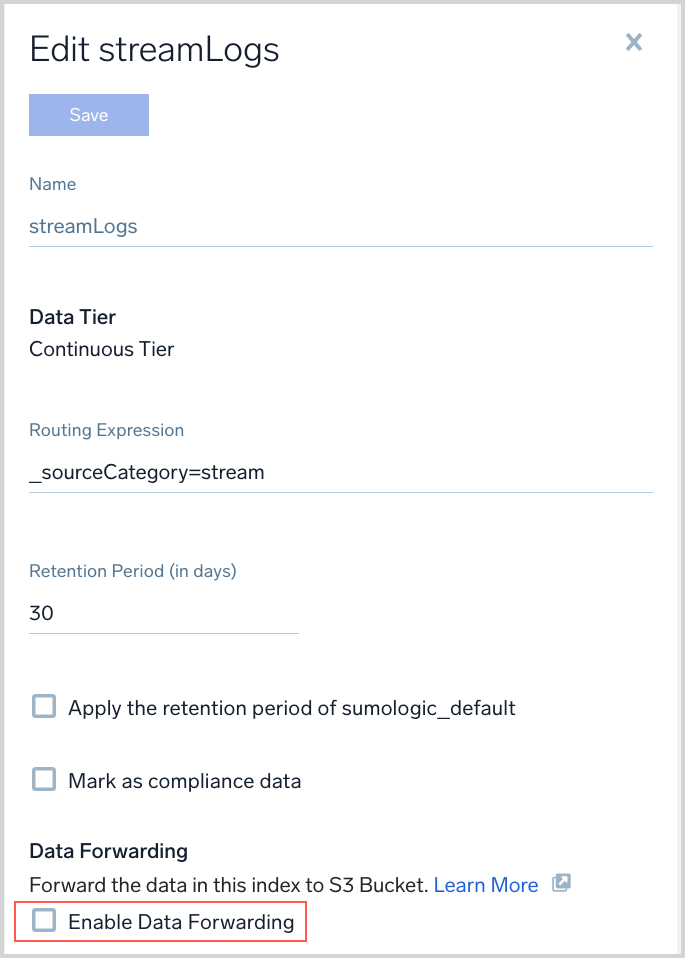
- Click on the Partition or View for which you want to enable data forwarding and click the Edit button. When editing, you'll see an option to Enable Data Forwarding.

- Click the Enable Data Forwarding checkbox.
- More options appear.

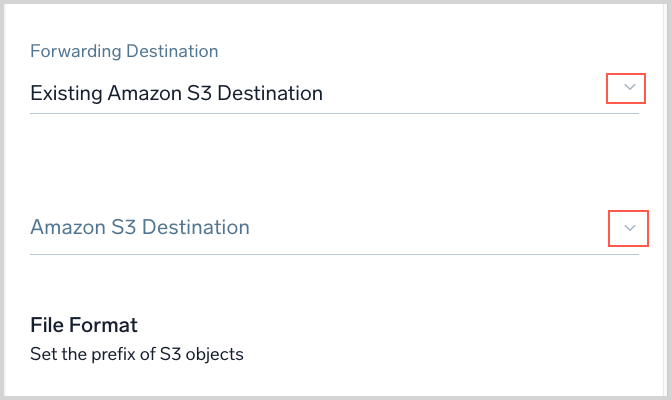
- Forwarding Destination. You can either choose an existing data forwarding destination or create a new one.
- If you want to create a new destination, choose new Amazon S3 Destination, and follow the instructions in Configure an S3 data forwarding destination above.
- If you want to use an existing destination, leave Forwarding Destination set to Existing Amazon S3 Destination, and click the pull-down to the right of Amazon S3 Destination, and pick a destination
- For File Format, you can enter the path prefix to a directory in the S3 bucket. You can include any of the following variables:
{index}will be replaced by the name of the partition or scheduled view.{day}will be replaced by the day of the year in the yyyy-MM-dd format.{hour}will be replaced by the hour of the day (0-23).{minute}will be replaced by the minute of the hour.{second}will be replaced by the second of the minute.{uuid}will be replaced by a randomly generated universal unique identifier.
If you leave this field blank, the default format{index}_{day}_{hour}_{minute}_{second}is used. For example, to place data in a directory namedSumoDataForwardingyou could specify the File Format as:SumoDataForwarding/{day}/{index}_{day}_{hour}_{minute}_{second}
- Click Save to save your changes and start forwarding data.
Error and alert conditions
An error or alert condition can occur with an S3 data forwarding destination for the following reasons:
If Sumo Logic is not able to verify the S3 credentials when the destination is saved, an error message indicates that the credentials were rejected by Amazon. If this occurs, verify Access Key ID, Secret Access Key, and the bucket configuration, re-select the Active check box, and save again.

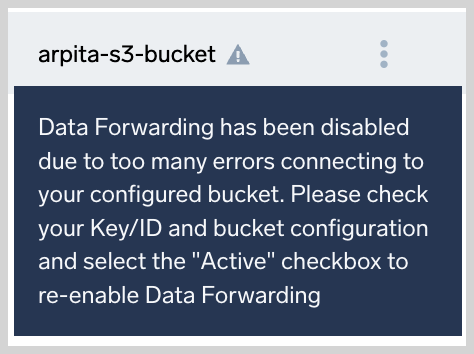
Errors and alerts that are generated after the destination has been successfully saved and started are shown on the Partitions page.

Hover over the icon to display the message.

In this example, Sumo Logic has disabled data forwarding due to errors in connecting to the S3 bucket. This occurs if the Amazon account or credentials change so that Sumo Logic is no longer able to authenticate to the bucket.