Archiving Log Data
Archive allows you to forward log data from Installed Collectors to AWS S3 buckets to collect at a later time. If you have logs that you don't need to search immediately you can archive them for later use. You can ingest from your Archive on-demand with five-minute granularity.
Do not change the name and location of the archived files in your S3 bucket, otherwise ingesting them later will not work properly.
To archive your data you need a Processing Rule configured to send to an AWS Archive Destination. First, create an AWS Archive Destination, then create Archive processing rules to start archiving. Any data that matches the filter expression of an Archive processing rule is not sent to Sumo Logic, instead, it is sent to your AWS Archive Destination.
Every archived log message is tagged with the metadata Fields specified by the Collector and Source.
Create an AWS Archive Destination
You need the Manage S3 data forwarding role capability to create an AWS Archive Destination.
Follow the instructions on Grant Access to an AWS Product to grant Sumo permission to send data to the destination S3 bucket.
In Sumo Logic, select Manage Data > Logs > Data Forwarding.
Click + to add a new destination.
Select AWS Archive bucket for Destination Type.
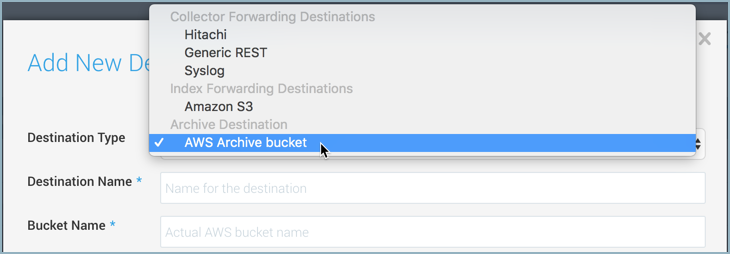
Configure the following:
Destination Name. Enter a name to identify the destination.
Bucket Name. Enter the exact name of the S3 bucket.
noteYou can create only one destination with a particular bucket name. If you try to create a new destination with the bucket name of an existing destination, the new destination replaces the old one.
Description. You can provide a meaningful description of the connection.
Access Method. Select Role-based access or Key access based on the AWS authentication you are providing. Role-based access is preferred. This was completed in step 1, Grant Sumo Logic access to an AWS Product.
- For Role-based access enter the Role ARN that was provided by AWS after creating the role.
- For Key access enter the Access Key ID and Secret Access Key. See AWS Access Key ID and AWS Secret Access Key for details.
S3 Region. Select the S3 region or keep the default value of Others. The S3 region must match the appropriate S3 bucket created in your Amazon account.
Click Save.
If Sumo Logic is able to verify the S3 credentials, the destination will be added to the list of destinations and you can start archiving to the destination via processing rules.
Create a Processing Rule
A new processing rule type named Archive messages that match allows you to archive log data at the Source level on Installed Collectors.
An Archive processing rule acts like an exclude filter, functioning as a denylist filter where the matching data is not sent to Sumo Logic, and instead sends the excluded data to your AWS Archive bucket.
Archive and forwarding rules are processed after all other processing rule types. When there are archive and forwarding rules they are processed in the order that they are specified in the UI, top to bottom.
To configure processing rules for Archive using the web application follow these steps:
You can use JSON to configure a processing rule, use the Forward filterType. See an example data forwarding rule.
Go to Manage Data > Collection > Collection.
Search for the Source that you want to configure, and click the Edit link for the Source. The Source must be associated with an Installed Collector.
Scroll down to the Processing Rules section and click the arrow to expand the section.
Click Add Rule.
Type a Name for this rule. (Names have a maximum of 32 characters.)
For Filter, type a regular expression that defines the messages you want to filter. The rule must match the whole message. For multi-line log messages, to get the lines before and after the line containing your text, wrap the segment with (?s).* such as:
(?s).*matching text(?s).*Your regex must be RE2 compliant.Select Archive messages that match as the rule type. This option is visible only if you have defined at least one AWS Archive bucket destination, as described in the previous section.
Select the Destination from the dropdown menu.
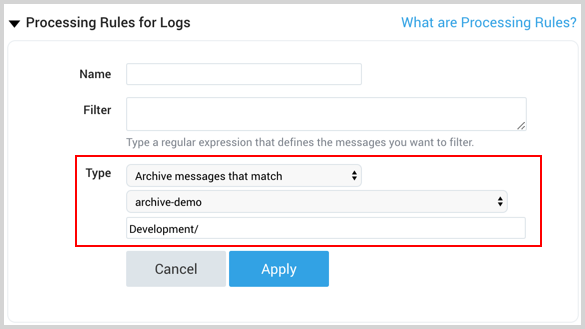
(Optional) Enter a Prefix that matches the location to store data in the S3 bucket. The prefix has the following requirements:
It can not start with a forward slash
/.It needs to end with a forward slash
/.Supports up to a maximum of 64 characters.
The following are supported characters:
- Alphanumeric characters: 0-9, a-z, A-Z
- Special characters: - _ . * ' ( )
Click Apply. The new rule is listed along with any other previously defined processing rules.
Click Save to save the rules you defined and start archiving data that matches the rule.
Archive format
Forwarded Archive files are prepended with a filename prefix based on the receipt time of your data with the following format:
dt=<date>/hour=<hour>/minute=<minute>/<deploymentName>/<collectorId>/<sourceId>/v1/<fileName>.txt.gzip
Collector version 19.361-3+ provides the ability to archive files with five-minute granularity. The format changes with the addition v2 and the removal of v1.
v2/dt=<date>/hour=<hour>/minute=<minute>/<deploymentName>/<collectorId>/<sourceId>/<fileName>.txt.gzip
Example format of an Archived log message:
{"_id":"763a9b55-d545-4564-8f4f-92fe9db9acea","date":"2019-11-15T13:26:41.293Z","sourceName":"/Users/sumo/Downloads/Logs/ingest.log","sourceHost":"sumo","sourceCategory":"logfile","message":"a log line"}
Batching
By default, the Collector will complete writing logs to an archive file once the uncompressed size of the file reaches 1 MB in size. You can configure the buffer size with the following collector.properties parameter.
collector.properties buffer parameter
| Parameter | Description | Data Type | Default |
|---|---|---|---|
| buffer.max.disk.bytes | The maximum size in bytes of the on-disk buffer per archive destination. When the maximum is reached the oldest modified file(s) are deleted. | Integer | 1073741824 |
Ingest data from Archive
You can ingest a specific time range of data from your Archive at any time with an AWS S3 Archive Source. First, create an AWS S3 Archive Source, then create an ingestion job.
Rules
- A maximum of 2 concurrent ingestion jobs is supported. If more jobs are needed contact your Sumo Logic account representative.
- An ingestion job has a maximum time range of 12 hours. If a longer time range is needed contact your Sumo Logic account representative.
- Filenames or object key names must be in either of the following formats:
- Sumo Logic Archive format
prefix/dt=YYYYMMDD/hour=HH/fileName.json.gz
- If the logs from Archive don't have timestamps they are only searchable by receipt time.
- If a Field is tagged to an archived log message and the ingesting Collector or Source has a different value for the Field, the field values already tagged to the archived log take precedence.
- If the Collector or Source that Archived the data is deleted the ingesting Collector and Source metadata Fields are tagged to your data.
- You can create ingestion jobs for the same time range, however, jobs maintain a 10 day history of ingested data and any data resubmitted for ingestion within 10 days of its last ingestion will be automatically filtered so it's not ingested.
Create an AWS S3 Archive Source
You need the Manage Collectors role capability to create an AWS S3 Archive Source.
An AWS S3 Archive Source allows you to ingest your Archived data. Configure it to access the AWS S3 bucket that has your Archived data.
To use JSON to create an AWS S3 Archive Source reference our AWS Log Source parameters and use AwsS3ArchiveBucket as the value for contentType.
In Sumo Logic select Manage Data > Collection > Collection.
On the Collectors page, click Add Source next to a Hosted Collector, either an existing Hosted Collector or one you have created for this purpose.
Select AWS S3 Archive.

Enter a name for the new Source. A description is optional.
Select an S3 region or keep the default value of Others. The S3 region must match the appropriate S3 bucket created in your Amazon account.
For Bucket Name, enter the exact name of your organization's S3 bucket. Be sure to double-check the name as it appears in AWS.
For Path Expression, enter the wildcard pattern that matches the Archive files you'd like to collect. The pattern:
- can use one wildcard (*).
- can specify a prefix so only certain files from your bucket are ingested. For example, if your filename is:
prefix/dt=<date>/hour=<hour>/minute=<minute>/<collectorId>/<sourceId>/v1/<fileName>.txt.gzipyou could use `prefix` to only ingest from those matching files. - can NOT use a leading forward slash.
- can NOT have the S3 bucket name.
For Source Category, enter any string to tag to the data collected from this Source. Category metadata is stored in a searchable field called _sourceCategory.
Fields. Click the +Add Field link to add custom metadata Fields. Define the fields you want to associate, each field needs a name (key) and value.
noteFields specified on an AWS S3 Archive Source take precedence if the archived data has the same fields.
 A green circle with a check mark is shown when the field exists and is enabled in the Fields table schema.
 An orange triangle with an exclamation point is shown when the field doesn't exist, or is disabled, in the Fields table schema. In this case, an option to automatically add or enable the nonexistent fields to the Fields table schema is provided. If a field is sent to Sumo that does not exist in the Fields schema or is disabled it is ignored, known as dropped.
For AWS Access you have two Access Method options. Select Role-based access or Key access based on the AWS authentication you are providing. Role-based access is preferred, this was completed in the prerequisite step Grant Sumo Logic access to an AWS Product.
- For Role-based access enter** **the Role ARN that was provided by AWS after creating the role.
- For Key access enter the Access Key ID and Secret Access Key. See AWS Access Key ID and AWS Secret Access Key for details.
Create any Processing Rules you'd like for the AWS Source.
When you are finished configuring the Source, click Save.
Archive page
You need the Manage or View Collectors role capability to manage or view Archive.
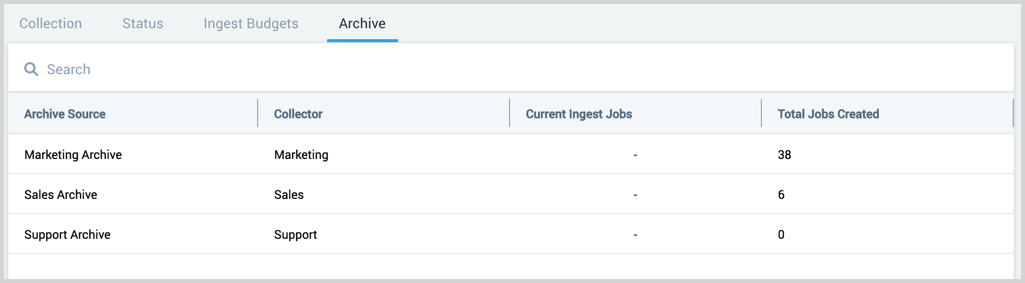
The Archive page provides a table of all the existing AWS S3 Archive Sources in your account and ingestion jobs. In Sumo Logic select Manage Data > Collection > Archive.
Details pane
Click on a table row to view the Source details. This includes:
- Name
- Description
- AWS S3 bucket
- All ingestion jobs that are and have been created on the Source.
- Each ingestion job shows the name, time window, and volume of data processed by the job. Click the icon
 to the right of the job name to start a Search against the data that was ingested by the job.
 - Hover your mouse over the information icon to view who created the job and when.
- Each ingestion job shows the name, time window, and volume of data processed by the job. Click the icon

Create an ingestion job
A maximum of 2 concurrent jobs is supported.
An ingestion job is a request to pull data from your S3 bucket. The job begins immediately and provides statistics on its progress. To ingest from your Archive you need an AWS S3 Archive Source configured to access your AWS S3 bucket with the archived data.
In Sumo Logic select Manage Data > Collection > Archive.
On the Archive page search and select the AWS S3 Archive Source that has access to your archived data.
Click New Ingestion Job and a window appears where you:
- Define a mandatory job name that is unique to your account.
- Select the date and time range of archived data to ingest. A maximum of 12 hours is supported.
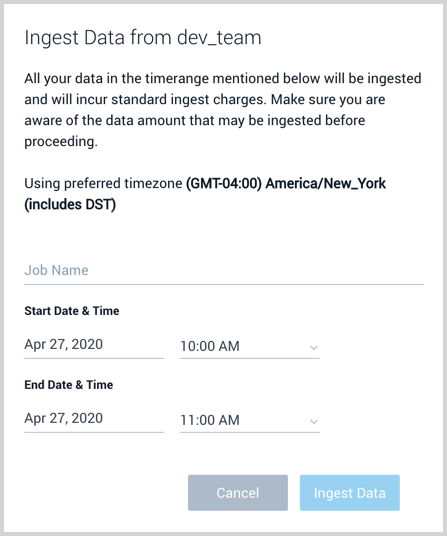
Click Ingest Data to begin ingestion. The status of the job is visible in the Details pane of the Source in the Archive page.
Job status
An ingestion job will have one of the following statuses:
- Pending - The job is queued before scanning has started.
- Scanning - The job is actively scanning for objects from your S3 bucket. Your objects could be ingesting in parallel.
- Ingesting - The job has completed scanning for objects and is still ingesting your objects.
- Failed - The job has failed to complete. Partial data may have been ingested and is searchable.
- Succeeded - The job completed ingesting and your data is searchable.
Search ingested Archive data
Once your Archive data is ingested with an ingestion job you can search for it as you would any other data ingested into Sumo Logic. On the Archive page find and select the Archive S3 Source that ran the ingestion job to ingest your Archive data. In the Details pane you can click the Open in Search link to view the data in a Search that was ingested by the job.
When you search for data in the Frequent or Infrequent Tier, you must explicitly reference the partition.
The metadata field _archiveJob is automatically created in your account and assigned to ingested Archive data. This field does not count against your Fields limit. Ingested Archive data has the following metadata assignments:
| Field | Description |
|---|---|
| _archiveJob | The name of the ingestion job assigned to ingest your Archive data. |
| _archiveJobId | The unique identifier of the ingestion job. |
Audit ingestion job requests
The Audit Event Index provides events logs in JSON when ingestion jobs are created, completed, and deleted.